2022-2023 Tech Resources for Educators
Clever- Classroom homepage
|
We are going to be using a SIS (Student Information System) management system called Clever this year which syncs with Oncourse to bring all of our district data (teachers, students, rostering) to 3rd party apps like Freckle, Edcite, Newsela, etc. Clever will then set up our teacher and students accounts, as well as roster our classes, for the district. Clever syncs with Oncourse every night and will automatically adjust rosters on 3rd party apps (like Freckle, Edcite, etc.).
|
Introduction to Clever
|
This will save teachers and administrators A LOT of time and effort that would have been spent on rostering all of our apps/programs.
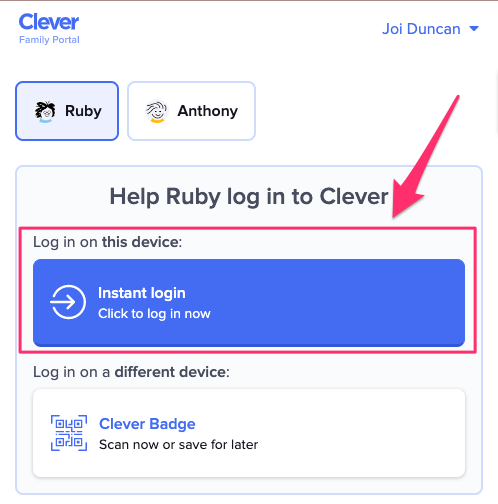
Also, Clever acts as a SSO (single sign on) homepage for students to access all of the different apps/programs that teachers would like to share. For example, students would only have to log in once to Clever and then from there they can login in to any other app/program without having to remember and type in another username/password. This saves a lot of time and makes using multiple apps/programs easy! For our younger students, Clever has QR badges that they can use to login by quickly snapping a picture, and again they will then be able to access any 3rd party app from there.
Lastly, there's a parent portal that can be accessed by the families of our students. Parents can use this portal to help their child login to Clever. Teachers can also use Clever to easily communicate with parents from 1 resource. The #1 complaint I heard from parents last year was that every teacher was using different resources and it was a pain to keep logging in to different websites. Clever would allow every parent in the district to only have to learn and use 1 app as a homepage and I think that will make things a lot easier for them.
Clever Badges
|
|
|
PEar Deck- Instruction
In order to deliver synchronous and/or asynchronous instruction to students in class or at home, we will be utlizing Pear Deck to create learning experiences that are teacher or student lead. Pear Deck is extremely user-friendly and turns any Power Point or Google Slide into an interactive learning experience that engages ALL students. In a normal Q & A, a teacher may get feedback from 3, maybe 4 students but has no idea if the rest of the class understands the material being covered. With Pear Deck, a teacher can ask interactive questions to check student understanding in real-time. This provides vital formative data in real-time which allows teachers to go back and quickly review material that students struggled with.
|
Brief OverviewPear Deck is an interactive presentation and lesson delivery tool designed to enhance learning as students move through a slideshow. Pear Deck's platform-neutral design makes it a great fit for both 1-to-1 and BYOD settings. Students use their devices to follow along with the teacher's slideshow on a classroom screen, or through a paid Premium plan, kids can complete student-paced decks in class or at home. With in-person delivery, teachers can pause at points where they've added one of several different question types, including drawing, dragging, text, number, and multiple choice. Teachers can view students' responses to these questions immediately, as well as share the results anonymously on-screen for all students to see. The Be Internet Awesome digital citizenship curriculum allows teachers to present lessons via Google Slides on topics such as kindness, bravery, alertness, and more.
On the setup side, teachers have the option to take some time preparing presentations and adding the interactive elements that make the platform engaging or insert interactive slides during the presentation. Pear Deck has made this process easy for teachers, not only with a huge repository of ideas but also through integrations with Google Slides and Microsoft PowerPoint. Other partners such as Merriam-Webster and Newsela integrate with Pear Deck to help teachers incorporate content more seamlessly, while features like Flashcard Factory give kids a chance to work as individuals or in teams to create study sets that the whole class can use. |
|
|
Full Pear Deck Webinar
Remote Learning with Pear Deck from Pear Deck on Vimeo.
Seesaw- Instruction
Seesaw: OverviewSeesaw: The Learning Journal provides opportunities for students -- and teachers -- to really think outside the box. Students can show their work and thought processes in real time by submitting a video of themselves working through a math problem, snapping a picture of a paragraph they wrote, recording themselves reading a poem, or uploading a file to demonstrate their learning. Encourage kids to submit a series of images along with notes that tell the story that connects them. Or let kids collaborate with each other using peer-to-peer feedback to offer suggestions on writing content, scientific hypotheses, or creative ideas.
Teachers at all grade levels and across all content areas can use Seesaw to keep digital portfolios of student work, including commenting on student submissions. You can communicate with families easily and share student work with them, or push out assignments to students to individualize instruction. You can also choose work to share with a broader audience via a blog. |
Quick Start GuideHow to Create Your First Lesson |
Edcite- Summative Assessment Tool
NEarpod- Instruction
How to make every lesson interactive
1. Get started with what you already have. Upload and make any of your favorite resources (PowerPoints, Google Slides, and now, any video) interactive. You can even upload videos directly from YouTube.
2. Give every student a chance to show what they know. Add real-time checks for understanding that have built-in accessibility features, like audio responses and Microsoft Immersive Reader.
3. Create lessons students love. Add media like Virtual Reality, simulations, and websites to support meaningful connections and keep every student engaged.
4. Know where your students are every step of the way. Get real-time insights into students’ learning during your lesson. Later, use reports to inform the next day’s instruction.
Create your lesson, knowing it will work in any scenario or device landscape
Live Participation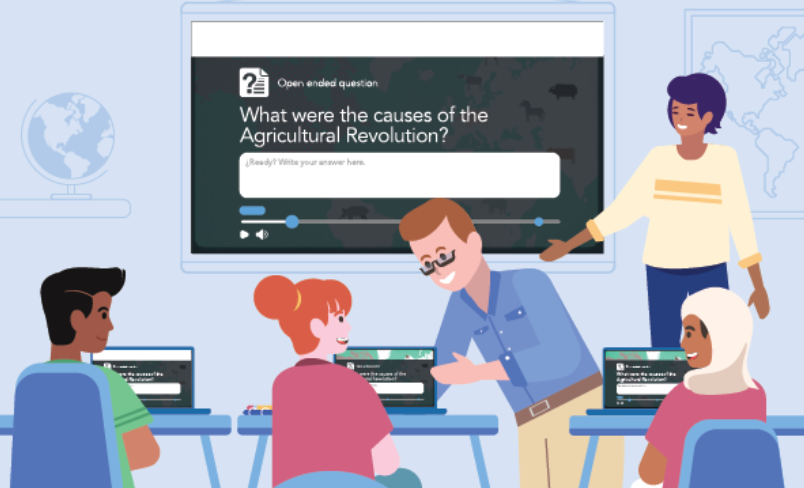
Whether in-person or with video conferencing, control the pace of the lesson and let students participate on their own devices.
|
Student-Paced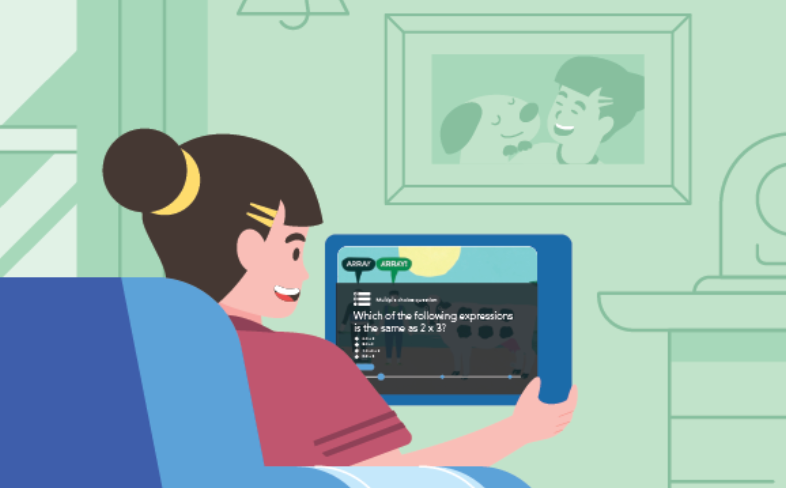
Allow students to progress at their own pace. This mode works well at home or when working in centers.
|
Front of Class
Use Nearpod even without student devices — project your lesson or video and facilitate collaborative discussions.
|
Edpuzzle- Interactive Videos
Introduction (1:09)
Google Classroom Integration (2:35)
How to Use Edpuzzle to Teach Remotely (13:53)
Playposit- INTERACTIVE VIDEOS
Overview (7:25)
Renaissance- Benchmark Assessment Tool
Overview
gOOOGLE cLASSROOM
Google Meet
Google Meet
Google Meet training and help:
Hold video meetings with people inside or outside of your organization.
Examples: Video conference with international teams, hold remote interviews, conduct webinars, and more.
Quick start guides
Get ready
Training topics
Settings & troubleshooting
More resources
Quick start guides: Learn how to use Google Meet
View Google Meet cheat sheet
View Google Meet in Gmail quick start
Get ready to use MeetBefore you start using Google Meet, make sure you have the equipment and access you need.
Check requirements for Google Meet
Get Meet: Web (meet.google.com), Android, or iOS
(Optional) Moving to Google Meet from another meeting solution? Get help switching over.
Get Google Meet help and training
Need help? Choose from any of the guides below.
Want a guided training experience? Follow the path below to start with beginners' resources and work your way to more advanced topics.
1.1 Start a video meetingLearn the different ways to start a video meeting, from Meet or Gmail, on the web and on your phone.
1.2 Join a video meetingLearn the different ways to join a video meeting, such as from a Calendar invite, meeting link, or conference room.
1.3 Add people to a meetingLearn the different ways to add people to a video meeting, such as from a Calendar invite, Meet, or a phone.
Level 2: Collaborate in video meetingsNow that you know the basics, learn how to improve the way you collaborate with your team in Meet.
2.1 Customize video meetings
Level 3: Learn productivity tips for MeetThese productivity guides can help you combine G Suite products to work faster and better.
Settings & troubleshootingManage Google Meet settings
Troubleshoot Google Meet
More resources
Hold video meetings with people inside or outside of your organization.
Examples: Video conference with international teams, hold remote interviews, conduct webinars, and more.
Quick start guides
Get ready
Training topics
Settings & troubleshooting
More resources
Quick start guides: Learn how to use Google Meet
View Google Meet cheat sheet
View Google Meet in Gmail quick start
Get ready to use MeetBefore you start using Google Meet, make sure you have the equipment and access you need.
Check requirements for Google Meet
Get Meet: Web (meet.google.com), Android, or iOS
(Optional) Moving to Google Meet from another meeting solution? Get help switching over.
- Switching to Google Meet from Webex
- Switching to Google Meet from Zoom
- Switching to Google Meet from Skype
- Switching to Google Meet from classic Hangouts
- Switching to G Suite from Teams
Get Google Meet help and training
Need help? Choose from any of the guides below.
Want a guided training experience? Follow the path below to start with beginners' resources and work your way to more advanced topics.
- Level 1: Start and join video meetings
- Level 2: Collaborate in video meetings
- Level 3: Learn productivity tips for Meet
1.1 Start a video meetingLearn the different ways to start a video meeting, from Meet or Gmail, on the web and on your phone.
1.2 Join a video meetingLearn the different ways to join a video meeting, such as from a Calendar invite, meeting link, or conference room.
1.3 Add people to a meetingLearn the different ways to add people to a video meeting, such as from a Calendar invite, Meet, or a phone.
Level 2: Collaborate in video meetingsNow that you know the basics, learn how to improve the way you collaborate with your team in Meet.
2.1 Customize video meetings
- Change screen layouts in a meeting
- Pin, mute, or remove meeting participants
- Use captions in a video meeting
- Use a phone for audio in a video meeting
- View meeting details and attachments
- Send chat messages to video meeting participants
- Present during a video meeting
Level 3: Learn productivity tips for MeetThese productivity guides can help you combine G Suite products to work faster and better.
- Plan and hold meetings from anywhere
- Stay connected when working remotely
- Hold large remote events
- 10 G Suite tips for video conferencing
- Use Meet keyboard shortcuts
- 10 G Suite tips to work with remote teams
- 10 G Suite tips for great presentations
- 10 G Suite tips to onboard new team members
- 10 G Suite tips to improve communication
- 10 G Suite tips for brainstorming
- 10 G Suite tips to go paperless
Settings & troubleshootingManage Google Meet settings
- Allow notifications from Meet, Chat, and classic Hangouts
- Change your camera, speakers, microphone, or video quality
- Change your mobile camera or audio device for Meet
Troubleshoot Google Meet
- Troubleshoot issues with Google Meet
- View known issues with Google Meet
- Report a problem with Google Meet
- Report abuse in Google Meet
More resources
ZOOM
ehallpass
OvervieweHallpass allows teachers and administrators to provide hallway permissions to students, and to track activity in a school’s hallways. The tool is intended to improve both the accountability of students and staff, and student security. The product is available for purchase on a per-student, per year basis.
ApproachStudents access e-hallpass via any web browser and write up a request to leave the classroom. This request includes both their intended destination and the reason they wish to leave. Students show the pass to their teacher, who approves it by entering her unique pin number. When the student arrives at his destination, the receiving teacher enters her pin, and the first teacher receives a notification that the student has arrived.
e-hallpass also allows staff to track data on student hallway activity. A timer tracks how long the student spent in between being checked out and checked in, and this information is sent to both teachers. Additionally, the tool will manage an online queue for minor problems for visiting the nurse, and allow librarians to send feedback on student behavior back to the classroom teacher. Finally, staff receive alerts for students who are not checked in to their final destination, improving school security. |
|